Friday, January 29, 2010

Crib and Bedding

I am starting to learn that if you try something out for a while, you might actually start liking it.

I really was not sure about this crib once we got home, I thought the color was WAY wrong, but I have to admit that the more that I am in the room, the more I really like the crib.
We paid $150 for this crib. It was a bit more than I wanted to pay, but it is a good quality crib.... once she told me that she would give us the rocking chair to go with it, I was sold on the idea.

I have a rocker recliner that I used with my older daughter for nursing, but it is a bit large for Kenidi's nursery and Brooklyn loves to sit on it, so I loved the idea of having one in both rooms.
We purchased the changing table first for $60. I loved that it was a dresser/changing table and that it had a hutch on top for extra storage. It is a darker color than the crib and rocker and that is why I wasn't sure about the crib at first. I have decided that I don't really care that they don't match perfect, it is growing on me.
Here is the rocker. I have to give a HUGE shout out for my neighbor Dave. This rocker was GROSS!!! The fabric cushions were covered in gross stuff. Our neighbor Dave works for a carpet cleaning company and he took these cushions to work with him and completely cleaned them up as a gift to us. They look AMAZING now and you would never know how gross they were when we got them.

Bedding is a big deal in any bedroom and the nursery is no exception. Something that I personally love to do in my nurseries is have original bedding. Don't get me wrong, they have some DARLING crib bedding out there that I would buy in a heart beat, but crib bedding is VERY expensive. Something that a lot of people do that I am personally not to fond of, they make the mistake of buying the bedding, then the matching lamp shade, the matching diaper cover, the matching window treatment, the matching wall hanging... you get the idea.

Now my complaint about this is... there is no originality to it! I want to walk into a room and feel like it is a one of a kind instead of feeling like I purchased it from a retail catalog.

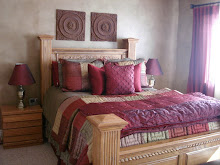
With that being said. I love the bedding that I did for Kenidi's nursery and it isn't anything fancy at all.
I showed earlier how I made this quilt and I am seriously in love with it. I spent HOURS on the thing so I should love it, right!
I paired it with the simple brown skirt that my mother-in-law made and I purchased a cream colored bumper and sheet from Burlington Coat Factory that is a Carter's bedding basic. These are the exact same that I used for Brooklyn's crib just in the cream instead of pink. The quilt in both rooms is what makes it original and unique..... One of a kind!

I have the main structure of this room together, now I am gearing forward with the accessories and window treatments..... I have it all in my mind and I have some of it purchased already, all I need to do now is find the time to get it done!!!!

Beadboard Process

I have found that this project isn't for the faint hearted. It was so much more work and time consuming than both my husband and I were anticipating but when all said and done, we are both VERY pleased with the results and I think we would do it again !? :)
Here is what we started with. Basic tan walls and a very small bedroom.
I went around the room and taped off just the top section of the room since I was only needing to paint the top of the room with the beadboard covering the bottom half.
I chose this peach color for the top half. The color is called Warming Peach from Sherwin Williams but I had Home Depot mix it in a Behr paint. (did you you know that Home Depot has other companies colors on file and they can just select the color and mix it without having to do an actual color match? I had no idea until they did this color.)
Next we took the 4'x8' panels of beadboard and cut them in half so that they were 4'x4' squares or down to whatever size we needed for each section and glued them down with liquid nails glue and then nail gunned them down to secure them.
Then we took a 5" baseboard and turned it upside down and ran it along the top to finish it off.
Some of the areas didn't butt up perfectly so my husband went in with wood filler and filled in the gaps and used a small nail to create the little grooves to make it look like the rest of the beadboard.
Here at the window sill we had a section that wasn't covered so used wood filler once again to make it look like the beadboard.
Once everything was in place and nail holes were filled, seams were caulked, and wood filler was sanded down, we laid drop cloths and tucked them under the base boards and taped the painted area off. We used this great product that had the tape and this plastic already attached together, well worth the little extra money.
Then we borrowed a spray gun from my husband's best friend and spray painted the beadboard.

We needed to match the color of the existing baseboards & closet doors, so we took a bathroom door into Home Depot & they were able to create a perfect match. I had them mix the paint in a paint-primer in 1 and in a semi-gloss finish so that it is easier to wipe up.
Now, I was taking votes on whether or not I should glaze the beadboard and most people said that they liked the glaze. I was planning on glazing but letting myself just have the baby and wait a while until I could do it right..... but, I have to say that the more I am in there, the more I am falling in love with the solid, classic white look and I don't know if I want to glaze anymore. I think that the glaze would look amazing, but I am starting to think that the classic white look might be a better choice to go with because it is easier to grow with when she gets older. Beadboard is NOT easy to paint unless you have a spray gun so I don't want to repaint it down the road if I get sick of the glazed look.

I think I am going to get the accessories in the room and the window treatments made and then we can see how it all looks together and I will decide them whether I want to glaze or not. As of right now, I am perfectly happy not doing it, I think my husband did an AMAZING job with it and I think it is beautiful just the way it is!

* We have 6" baseboards plus the beadboard which is 4' and then a 5" baseboard turned upside down on the top, making this almost 5' tall. This is taller than your standard chair rail style beadboard. I opted for this height so that it would clear the height of the crib and make a nice backdrop for the crib without cutting into it.

Tuesday, January 26, 2010

Take it back

So my daughter is here and she is doing fantastic!!!! She is absolutely beautiful and we are loving every minute of having her here with us.

So I have to take it back! Not the crib, but what I said about the crib. We went to Lowes and told the guy that we bought a crib on KSL and just told us to come this way. I guess it happens a lot that people purchase cribs and they don't get the right hardware.
Anyway, we found the right hardware that we needed and were able to get the crib put together great and now that it is up in the room, I actually REALLY like it. It is a beautiful crib and the orange color has grown on me. We got a good price on the crib and now that we got the correct hardware, I guess it wasn't to bad to have purchased the crib used. Oh, and did I mention that the lady that we purchased the crib from gave us the matching rocker/glider and ottoman for FREE!

I will post pictures soon and show you what it all looks like, but her room is still a work in progress and I will show it along the way..... lots of projects to show.

Tuesday, January 19, 2010

Crib purchase

So my daughter has decided that she just doesn't want to come out! I am now 3 days overdue and am not quite sure when she will come.

This past weekend we purchased a used crib from ksl and it didn't quite turn out the way I had hoped! We got the crib home and it was the wrong color! The changing table we purchased is a dark cherry wood, really quite a pretty color and the crib is a very orange cherry.... then to add to the disappointment, the lady gave us the wrong hardware so we couldn't get it put together. We have to go out again today to go and get the hardware from her.

I am definitely disappointed at the way it all turned out and I have decided that I need to wait to design anything else until after I have this baby, I am questioning my abilities these past few days... I think I am trying to rush things and I settled on a crib just wanting to get one in there.
Oh well, we will either make it work or we can sell it and start over.

Now I have purchased 2 used cribs and I have to say that I don't know if it is the best way to save money. We have had hardware problems with both cribs so I am now thinking that it is worth spending the extra money on a new crib and getting the one you want as well as knowing you are getting the correct hardware and it is safe.

Just a thought if you are in the market for a crib anytime soon.

Thursday, January 14, 2010

Consensus

Thanks to everyone for your responses today!

So the consensus through out the day with emails, texts, facebook responses, and comments was that more people seemed to like the glaze.

My decision.... I really like the glaze and I believe that I will do it, but I am giving myself permission at this time to not have everything ready and perfect before she comes! I am exhausted and I think I need to just allow myself to rest and get ready for her.

Glazing can be done at anytime and I want to make sure that I do it right and that I don't just rush the job just to get it done. Because my husband spent so much time on the beadboard, I want to make sure that I do the glazing right and that I am really happy with the job that is being done.... So, as of right now, I am leaving it white and down the road I will probably decide to glaze once I feel like I am settled in my new life with another child.

Plus... I decided that I need to slow down a bit, otherwise I might just get my house all designed and run out of things to post about! :)

HELP!!!! Beadboard dilemma

Please, Please, Please HELP!!! I need everybody's opinion on the beadboard. I was hoping to keep the wall color a surprise until later but I am in need of some serious help.

Here is a picture of a sample board that is glazed and then the actual wall beadboard painted the plain white.

I can't decided which to do. My husband has spent SO much time on this beadboard that I am scared to glaze now because I don't want to ruin it or make it look dingy. Please give me your opinion now that you see the Peach wall color with the bedding and both options.

AND... I need to know soon!!! I need to decide if I should glaze it today or not.

So Torn..... Please Help and give me your input..... you guys aren't tied to the hard labor that was put in, what do you think honestly and truly looks better?

Wednesday, January 13, 2010

Before & After No Cost Spare Bedroom "Updo"

So my spare bedroom is probably the least important room in our house. it doesn't get used much and as you can see in the pictures, I quite often will use it as a storing ground until I find a place for certain items.

I didn't want to spend any money on this room but it has been driving me crazy with how bland and boring it is!!!!

I sold some old bedding on our local classifieds and I took that money and bought this simple brown bedding from Overstock.com when we first moved in. I had the orange and green pillows from years ago and thought I would use whatever I had so it didn't cost me anything. Everything looked so drab that I had to do something about it.
I went down to my paint selection in our basement and I pulled out the leftover red/orange color from my family room and decided to paint 2 walls in the spare.
I painted the back focal wall behind the bed and the window nook. I pulled out some chocolate brown pillow shams I made years ago and wasn't using as well as the small brown pillow. I did purchase this throw blanket at Costco... mainly to fulfill my soft blanket obsession and I moved the wreath from the far right wall to above the bed to fill the void.
Here is where the wreath was before and it was looking quite sad.
I added a little bit of spray paint to the wreath to make it darker... it blended in with the wall before.
Here is the messy room before with the window nook.
Here it is painted the red color. (I still have to add drapes, cover that bare pillow, and hang the magnet board still sitting on the floor).
Here is our old dresser that will stay here until we figure something else out.
Here I just added a live plant that I had and it seemed to warm up the dresser and take away from how unattractive the dresser is (it was a hand-me-down from my step-dad).

But I have to talk about the dried arrangements flanking the mirror.

If you notice in each of those last 2 pictures, I had dried "floral" type stuff in each but they were different.

I literally went out and pulled WEEDS..... Yes WEEDS people and dried them.
I started off with these wheat looking ones that worked fine, but they kind of got lost against the neutral wall....
so I changed them out with these orangey colored weeds.....
I know that may seem weird to some of you, that I would actually go out and pick weeds... but it worked for what I was looking for and it was FFFRRREEEEEEEE!!!!

I liked the color of the second ones better with the wall color.

Like I said before, this room is NOT my priority and I know it still needs a lot of work, but I definitely can tolerate it a lot more with the walls painted and it was just with stuff that I had in the house.

*OK.... I know you can see my NOT SO PRETTY self in the mirror reflection.... I was still in pjs with my glasses on, hair pulled back, in my husband's sweatshirt and probably 8 months preggo! Please don't judge me off of those!!!!

Monday, January 11, 2010

Kenidi's Crib Quilt

Now remember these fabrics that I purchased for Kenidi's crib quilt and nursery inspiration?!
Well I worked INCREDIBLY hard and long hours to get it finished and it is finally done!

(Normally I would show you the finished piece here but I didn't get a picture in here so I am just going to go through the steps of how to make the quilt and you can see the end result at the bottom! :)

The first step you need to do is pick out your fabric and have a pattern in mind. The next thing that you need is a Rotary Blade and cutting mat.... this makes it SO much easier than cutting with scissors. I made my squares 6"x6" but you can go bigger if you would like. I purchased a 1/2 yard of each fabric (in flannel) and I have 5 different fabrics and then bought 2 yards of the cream fabric (also in flannel) which is my backing.
After the many hours of cutting (it was very time consuming!) I laid them out into the pattern I wanted and then labeled each column by numbers to keep them in order.
Next I took some quilt batting (I happened to have some in my stash already) and cut 5"x5" squares and sandwiched them between the cream backing and the front square.
Then I took each of my labeled piles that were in order with the batting sandwiched between already and started sewing an X pattern through the squares. My sister gave me this little idea to sew on part of the X and then just start sewing on another square and create this chain, then I cut the threads between them, stacked them back in order and did the same thing to the other part of the X. Doing it this way made it go so much faster and I didn't waste as much thread.
After each X in sewn on all of the squares, then you need to sew all of the squares together in order with the seam facing the front of the quilt. After each row is sewn, you need to sew the rows together. Like in the picture above, you need to pin the seams together on each square so that you can make sure that they match up (again, make sure that the seams are facing outwards so you can see them in the end).
Here it shows the rows all pinned together and ready to sew.
After all of it is sewn together, you need to sew around the outside edge and finish those sides off. Then, the not so fun part of cutting the seams begins.

The picture above, shows part of them cut and others not cut. You should cut about every 1/4 inch or so to get a really nice frayed edge.
Here it shows what the outside edge should look like, you also need to cut the outside edge.

After all the seams and edges are cut, you throw it in the washer and dryer and you have a frayed Rag Quilt!
And here it is all finished!
The close up of it.

It turned out super cute and I am really happy with it, but I have to admit that it was WAY more work than I was anticipating but it will be so cute in the room.

Also, it shrunk a bit after I washed it. It is still a good crib size since I made it a little big in the first place but be aware that is will shrink.

So now seeing the quilt all made up and you know that I have beadboard on the bottom of the nursery that we have been working on, does anyone want to guess what color I painted the top part of the walls? It may actually surprise you.

Saturday, January 9, 2010

Living Room Drapes Hung!!!

I am in LOVE!!!!!

I am so excited to finally have my living room drapes hung up! These are what really make the room since I designed everything around these and you couldn't really tell where I was going without these.

I have to give a disclaimer..... My camera does not take good pictures when there is sunlight in a room, it creates this weird glow so of course these pictures don't do it justice! But it gives you an idea... I will post better pictures if I can get them as I progress in this room.

Here they are!
You can't tell real great that there is red in them... love the red!

We live on a corner lot and get a ton of sunlight in this room so it really is hard to get a good picture when the sun is shining in here pretty much all day.
This is a terrible picture I know (window on each side) but I wan't to show the pillow that I made on the chair with the drapes.
These drapes were purchased at Target and were about $22 a piece. The thing that makes these look so great and more high end is the fact that I didn't sheer them onto the rod, I purchased rod rings for them. I have said it before and I will say it again, rod rings add length as well as a more high end look as opposed to sheered on their.

My husband picked out the rod hardware all by himself and I think he did a fabulous job! Once again, notice the rod is a thicker rod which is more substantial looking and makes it look more expensive and higher end.

My funny little $10 ksl chair is starting to make more sense in the space isn't it? I just want to get the wood stained to a darker color and I will be happy with it.

I still have to get some stuff on the walls, pillows on the chair and sofa and some tables or build an ottoman or something..... I am still trying to figure out the best way to layout this room since the furniture isn't centered with each other.

But.... I am loving going into this room now with those drapes up and I LOVE how they completely warmed up the space and made it very inviting!

Friday, January 8, 2010

Making Of - Block FAMILY sign

When I was in Colorado for Thanksgiving, my mother-in-law gave me a kit to make this Block FAMILY sign.
All it is is some 2x4 blocks cut, painted and then some vinyl lettering stuck on. Such a super simple project and can be done for very inexpensive.
I actually worked on this up at my cabin about a month ago. I can't stand just sitting and not getting things done so I decided to take this project up there so I felt like I was accomplishing something.

Here is how I did it.
There are 2 different sizes of blocks that were cut out already. I sanded them down and then I just grabbed some green craft paint that I had already in my stash.
I painted all of the blocks green like I show here on the left block and then I took my sand paper and sanded the edges down like I show on the right.
After they were sanded down, I took an old rag and some leftover wood stain (that was used to satin my walls) and loosely rubbed on the edges and over some main areas of the blocks (I didn't want it to look to uniform, kind of messy if you want to use that term).
After it was all dried (I let it sit a few days) I put the vinyl lettering on that was already cut out when my mother-in-law gave it to me.
I was originally going to put it in my office since I already had my Family framed sign down in the main living area but when we went to set it out, my daughter ran right for it.

We decided to put it down in the family room anyway on the console table where my daughter can't reach it (yet!)
I really like the extra step of the stain over the paint but you don't have to do that step... it would look good without it, but I am very happy with the way that it turned out...

I hope my mother-in-law likes it too since she could have kept it and put in her own home somewhere....

Thanks Judy!

Wednesday, January 6, 2010

Master Bathroom Paint Color

I have been getting a lot of people wanting to know the paint color I used in our master bathroom.
The color is Fresh Baked Pumpernickel GL030 from Glidden at Home Depot. I am not a huge fan of the Glidden brand so I had them mix it up in a Behr brand paint with a Satin finish. Some people like more sheen on their walls so you can go with a glossier finish but I wouldn't go lower than a satin.

I promise I am still here and alive but we have been SO incredibly busy with quilt making, beadboard hanging and everything that goes with that that I honestly have not had time to get pictures posted of things lately. Stick with me and I will get some posted hopefully soon of some projects I have been doing and have done but haven't posted about.
Related Posts with Thumbnails