Sunday, December 13, 2009

Oh Christmas Tree... How I love thee!

For those of you who are return readers, you have probably already seen my post on my Christmas Tree.... but I have decided to join a Christmas Tree Party with the Thrifty Decor Chick so I am posting a few pictures once again.

For you "New Visitors", here is my tree! Pictures don't do this justice but they never really do.. right!
If you want to read more about how I do my tree, you can visit my full Christmas Tree post further down.

I am really big on Christmas Tree Toppers so I have quite an elaborate one but I LOVE it!!
Merry Christmas to everyone!

Thursday, December 10, 2009

Laundry Room Reveal

I am sure that my husband and I are one of the few couples that still share a computer but that is about to change. My husband is working from home now and it has made it pretty much impossible for me to have computer access but his boss is buying him a new computer so that should change in the next week or so!.... So if you have been wondering why my posts have been far and few between, that is the reason.

But.... I am still busy doing stuff around my house in the mean time so I do have stuff to post.

Right before taking off to Colorado for the Thanksgiving holiday, I broke down and decided that I wanted to get my laundry room done and can I just say that I LOVE the way that it turned out!

I think I am one of the few people out there that doesn't mind doing laundry and I think I have figured out why..... I only do laundry once a week and I have discovered that most people laundry everyday and that is why they don't like it!

Well, if you are doing laundry a lot, you are spending lots of time in your laundry room and that is a great reason on why you should decorate that sad room in the corner of the house! :)

Here is my laundry room!
Once again, the pictures don't do it justice.... the paint color isn't very good in the picture but it is a fun light green color.

AND... Once again, I spent pretty much NOTHING!!!!

I bought the green paint for a project I will someday do on my staircase and knowing that I wasn't going to use a full gallon I decided to paint my laundry room with what I knew would be left over.
Here is a picture without the flash.... wall color looks worse in these pictures.

So I have to talk about my words on the wall! LOVE, LOVE, LOVE these! I painted these on... I have the equipment to project these on the walls and paint them and customize them the way that I want so it is easy for me to do this. You could use the vinyl lettering but I am too cheap for vinyl lettering :)

Don't you just LOVE the saying?

I showed a couple of sayings to my husband and he started laughing and said "I think you know which one I want".... Of course we both agreed with "Drop your drawers here"! We both love some humor in our lives so we went with that one.

The paint, both the black and red, were left overs from other projects.
The black boxes were purchased years ago and have been used in various spots for storage. This shelf seemed like the perfect spot in this house.

The red basket was given to us as a house warming gift in my last house and I decided to put toilet paper in it so that it is up high enough from my daughter ripping it apart!

The basket is used for my dirty rags and towels from the kitchen and was purchased years ago at Roberts for about $.13 (yes that amount is correct) and has been sitting in my basement unused.

This shelf was from my last house and was painted with left over red paint from the family room.

Wreath was purchased a while ago also for like $2.50 from my favorite wholesale place Taiwan.

I haven't finished the accessorizing on the shelf yet but I figure I have time for that. The things that are on there are just things I had.

Remember my Inspiration Piece... the rug, it is in there also as well as my $1 waste basket!

So you may remember this mirror from my fall centerpiece. I decided that I wanted it in here instead and hung it up over the existing mirror with some ribbon I had and it just hung on a large nail and I am absolutely in love with the affect!

I did purchase the towel just for this room and it cost me a whole $3.50!

So... if you count up the cost of items recently purchased for this room... that would be a whole $3.50 for the towel and $1 for the waste basket if you want to add that in (I guess the paint also but that was already purchased for another project).

So cheap! And I have to tell you that I love to go into my laundry room now!

Like I mentioned once before, this room is also our one and only bathroom on the main level so I am no longer embarrassed for people to come in here.... I wouldn't be surprised if I leave the door open just so people will want to go in there and look if not to use. :)

*Side note - notice that the ceiling over the shelf is painted the same green color as the wall. I followed the same rule here as I would in a bay window and I am so happy that I did. If I would have left it white, it would have completely distracted from the fun painted words and boxes and I don't want that!

Monday, December 7, 2009

Tip Of The Week - Painted Archways

I hope everyone is enjoying this holiday season thus far! It has been snowing here most of the day and has really brought the Christmas season with it!

It is good to be back home after spending over a week and half in Colorado with my husband's family and now I need to get in gear and get some stuff around my house done.... both Christmas decorating and regular decorating!

My tip for this week is something that I thought of while I was in Colorado. My mother-in-law has redone a big chunk of her house these past few months and I noticed that she followed this one rule perfectly through out her house and I thought I would share it with everyone in case they didn't know this little tip.

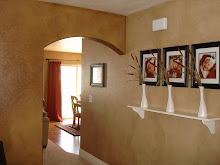
How many of you have an archway or a door type opening like this picture?

I know it is common for people to come to these when they are painting and not know whether they should paint it or not if they are doing an accent color and both walls on each side of the doorway are different colors.

Here is the rule *Paint it the same color as the wall as the flow of traffic goes.

So basically, if you were to start at your front door and walk through the rooms, your archways should be painted the same color as the wall you are looking at.

I happen to have a DON'T example of my last house!
I wanted to paint the archway and my husband didn't like that idea, I let him win this argument because I was lucky that he was even letting me in the first place. It really bothers me that it isn't painted here.... after I painted this, I did officially find out that it is a design rule and I should have gone with my designer instinct and told my husband it was a rule.

Oh well, we weren't there long and I have made up for it in this house.
Here is my living room when I painted the base color. Notice I painted the archway the same color as the wall.
Then here it is stained.

What you don't see is that the back side of this wall is the burnt orange/red color. This just really helps with the flow of traffic and is much easier on the eye as the eye looks around.

If you notice on the very top picture, there are 2 archways. The first archway is white because that wall is white.... the back archway is the warm chocolaty color to flow with the back wall color.

Hopefully this is useful to others since we happened to make this mistake in our own house at one point.

Wednesday, December 2, 2009

Out of Town

I am in Colorado with my in-laws and will be here for the next couple of days. I don't really have computer access here so I haven't been able to do a post.... I promise I haven't forgotten about all of you who are interested in having posts, I just don't have my computer to post pictures up.

I was hoping that while I was here I could get some pictures of my mother-in-laws decorations to show some ideas and because my daughter is such a stinker with getting into things right now, my mother-in-law decided to wait until we left to get them up. Definitely can't blame her, but that means no Christmas pictures from this house.

I hope you all had a Great Holiday!!!!

Tuesday, November 24, 2009

Tip Of The Week - Photo Gallery

In honor of the Thanksgiving this week, I wanted to do a post based around families!

I am HUGE on having family pictures in every room of the house and really displaying your life in this way.

People often struggle with how to hang pictures on the wall and how to display them so I thought I would show some examples.

Now here is a full on photo gallery. This is a wall next to our ping pong table at my family cabin.
The pictures on here are all in sepia tone, the frames are all different but they coordinating with each other.

The way to create a gallery like this, map out a section (square) that you want the pictures to stay within. We measured on both sides the same square section and had 4 frames create the 4 corners of that square. Then you just fill in the center of that with your remaining frames.

*Always lay your frames on the ground and map out how you want it first before you start hanging!

I really do love it when there are a ton of frames clustered together, they make a BIG statement and they show people what is important to you.

Now here is the photo gallery in my office. I had these 3 shelves sitting in my house from buying them at my neighbor's moving sale and I knew I wanted them in my office and I new I wanted them worked into a photo gallery. After contemplating on it for months, I finally came up with this arrangement.

It obviously isn't completely finished since there are frames still empty, but when I said and done, I opted to create more of a triangle shape with my pictures and that entirely came down to the very top painting of Cabo San Lucas that we got on our trip and I wanted to display it.

This gallery is entirely focused on our travels. I have to get a lot more of our travel pictures up, but I wanted to show people the things that we have done and have it as a constant reminder to us of our fun travels together.

The great thing about this arrangement is that not all of the pictures are hung. Why not lean them on a shelf and why not layer them on top of each other? Potterybarn is the master at photo galleries and I looked at a lot to kind of get an idea of how I wanted this one to be. The great thing about layering, you can usually get more pictures in a small space.

People LOVE looking at pictures when they come into your home so it is a great thing to have out on display.

Something that makes this work well is that because I wanted to keep all of the pictures in their original form and have color to them, the black frames help keep it consistent. If I had colored pictures and different colored frames, it would look really busy and take away from the pictures.


Now here is something a bit more simple.... 3 of the exact same frames clustered together in a row. Once again I opted for black frames (just worked in my home) and I framed pictures of our new little family shortly after my daughter was born.
These pictures are in my front living room so people can come right in and have something personal to look at.
Now on the same wall but in the family room I have this family picture hanging. I wanted to show you this to give you an idea....... Only hang a single picture if it is in proportion to the wall. So many people will hang a single picture like this on a wall and the wall will be much to large for that one picture.

Use your good judgement as to the size of the frame as to the wall.

Another thing to notice when hanging pictures..... Where you are hanging it. So many people will hang their pictures to high or right smack dab in the middle of the wall.

There is a rule that if you divide your wall into thirds horizontally, you should hang your picture somewhere on the top line.

Now I have created a rule that works great for me in my house.... James is a good amount taller than me but I have found that if I hang my pictures a bit high for my eye level and bit low for his eye level, it is a perfect height for us.

Hopefully in the future I can do another post on this and show more examples because I know that it is something that a lot of people struggle with.

Have fun with your photos and displaying them..... people really do love to see who you are on a personal level when they enter into your home.

Friday, November 20, 2009

My Office - Preview

I was really hoping to have my office finished by now but that just hasn't happened and probably won't happen for a while.

SO..... I decided I would give you a preview of what I have done already.

The amazing thing about this room... It pretty much cost me NOTHING!!!!
And that includes the furniture!
I really did get lucky with this room. This desk we got a few years ago for Christmas, it was a gift from my parents (I know, what an awesome gift! It was actually money and we chose to get a desk with it). The desk chair we got for free, my husband's work got new chairs and they let him bring his old one home!

The paint in this room was leftover from the accent wall that I painted in the Living Room. I tried to do the really cool leather technique that my sister did her wall, but it looked HORRIBLE on my wall... I think I used to dark of stain... I had to think really quickly and I decided to just take my oiled rag and quickly spread it around and made it look like my other stained walls. I was so lucky that it worked and that you couldn't tell anything different.
This room is right at the top of our stairs as you walk up so it is open to everything. You can see in the front of our desk that we have some glass cubbys and we have a tradition of purchasing a picture frame on every vacation we have and putting a photo of us while on that vacation. We put the frames in these cubbys as well as a few on the desk.
And here are the infamous blue chairs that I believe I am going to keep blue. If you haven't read here before, these blue chairs were given to me by my step-dad. They were chairs in his old work office so again they were FREE!!!! My pictures have a lot of blue in them and the top diamond picture is a painting we got in Cabo San Lucas that is blue so I think blue will have to stay.
I will talk more on picture displays in another post but I love the way that this one turned out. The 3 shelves I bought at my neighbors moving sale and cost me $1.50 for the 3. I had a lot of the picture frames already, but I bought some also at the DI for $1-$2 each and spray painted them all black to coordinate. I still haven't ordered a few of the pictures that will be displayed here so it isn't quite finished. Notice my $5 table between the chairs that I spray painted... I haven't put anything on it because of my daughter, but these picture albums work perfect in the bottom and she doesn't bother them because they are pretty heavy. I got the albums at Potterybarn a few years back with a gift card.
Now please excuse the massive mess on top of the filing cabinet, it is all stuff that still needs to be filed away and I can't do it until my husband helps me since it is his work stuff (as well as the garbage can that my daughter likes to get into :) This filing cabinet was also given to us from my husbands work so was once again FREE! The lamp base was FREE also and I have a curtain rod that was given to me for FREE that I spray painted black and will get hung up as soon as I get hooks to hang it on.

All I need for this room is some fabric so make some drapes and some pillows and I am pretty much done.

I am pretty happy with the way it has turned out so far and I love that it hasn't cost me hardly a dime. Now to just find some fabric that I like with blue in it.....

The best part about this room are the memories that fill it with all of our travels!

Thursday, November 19, 2009

Christmas Decorations - Part 1

I am not done putting up Christmas decorations (it's a slow process with my daughter), so here is part 1 of my decorations. I have a few things up and I wanted to show some ideas before everyone else started getting their stuff out.

Here is a picture of the shelf that I would normally hang stockings from,
since my daughter will pull on them and hurt herself, I decided just to decorate it with the ornaments that I couldn't put on the bottom third of the tree since she pulls them off.

I bought the runner from Back Home Decor when they had their open house, I had every intention on using it on my dining table but decided that it would be perfect for the shelf.
I took some floral and greenery stuff that I had and spread it out on the back and then just arranged the ornaments in front of that.
These 2 white vases were on the shelf before and I just filled them with fun gold floraly stuff I had and then I put my stocking hangers on each end to help weight the fabric down so it didn't slip and make everything fall.
Here is the close up of it. I love how this is something totally new to me this year but didn't cost me anything but the runner which I had purchased a bit ago for $7.

Now, I had shown a fall centerpiece that I made a while back and said that I was going to just change a few things up and keep it for Christmas..... Well, I wasn't feeling it for Christmas so I decided that I need a sparkly centerpiece.
Once again, the pictures don't even come close to doing this justice. What I love about this piece, it is an asymmetrical arrangement and isn't a typical kind of arrangement.

I took a glass vase that I had in a cupboard, grabbed some floral stuff that I had in my Christmas stash,
and took these orange glass beads that I had in a bag and put it all together. I placed it on top of this platter that I had on an easel in the corner of my kitchen and bunched up some fabric that I had in my stash left over from wedding almost 8 years ago.

Again, this cost me nothing but is something brand new that I haven't done before.

Now of course you have to have a nativity for Christmas!
My mother-in-law over a course of a few years got me this Willow Tree nativity, it was such a unique set that I loved and had never seen before.... well a few years later, almost every store was selling it and I was a bit bummed about it.... but, my stable is a custom made piece made out of old barn wood so at least I have that that is different from others.

I decided to take a stand of lights and staple it to the back of the stable as well as a few in front and then strand the whole thing of lights underneath this fabric that was left over from the Fall Centerpiece project I did. (This is a very light, airy fabric that I'm not too concerned about a fire hazard... . I will be watching it close and I don't leave it on all day, only at nights.)

I love the idea of getting old fabrics out and using them underneath displays... it really softens everything.

These are decorations that I LOVE!!! I don't know if you have ever seen these glass blocks before, but these are ones that either I or my mother-in-law made.
This one my mother-in-law made out of a corner glass block. She had some letters cut out and put on it and took some of my ribbon and a few snips of my Christmas ornament sticks and created this for me a few years ago.
And here it is all lit up.

These ones I made out of the textured glass blocks.
They are fairly easy to make and I think they are such awesome decorations. I don't like the way I have them at all in these pictures so I am going to change it, but I wanted to show you how cool they are.
If you are interested in making these, all you do is purchase the glass blocks and a glass cutting drill bit. Drill a hole in one of the small sides of the block. Once the whole is drilled, clean it out of any glass shards there may be, take a strand of lights and cut off the end with the plug that doesn't plug into the wall and shove the strand inside the hole. Wrap it up like a present with fun stuff and you have a cool decoration.

Like I said before, I don't have much out yet. I have to sample and test everything out with my daughter and see if it is going to be something that she will mess with and if she does, I have to try and come up with something new.

I am leaving for Colorado to spend Thanksgiving with my in-laws and will be there for 10 days. We are leaving in less than a week so I may get another Christmas post up but I may not get one up until after I get back. I am finding it hard to decorate when my Living Room isn't finished and I have no where to set decorations.

Things don't always come to me right away.... I think that sometimes people think that just because you are a designer, ideas just pop to you instantly.... Sometimes they do, but a lot of times we have to think on things just like everyone else. I am a feeling person, I have to sit with something and see how it makes me feel. So that is the same way with my Christmas Decorating.

Related Posts with Thumbnails