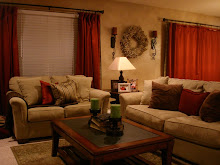
I have been wanting to post these pictures forever but I have been waiting for a few things to get hung. Brooklyn's nursery is not a nursery for everyone! Some people may have a difficult time with the dark color that I used, but I love the way that it turned out and I wanted something different and I got it.
INSPIRATION PIECE

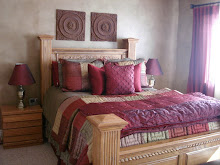
Every room should have an inspiration piece (I will go into more detail another time) and this was mine for her nursery. This is a quilt that my step-sister Maria made with her mom. I thought they hit the nail on the head with the colors and fabric that I had to see what I could do to turn it into a room. One thing that I absolutely love that they did was make it a bigger size than a crib. This will be a great little comforter when I turn the crib into a toddler bed.

This wall color probably scares some people out there, but I have so much white and light colors in the room that it doesn't feel closed in at all. This room also gets A LOT of sunlight in it! You know that if my husband was ok with doing it that it isn't a dark feel at all.

This crib was a crib that we found on my trusted KSL classifieds. I bet you can't guess how much I spent on this crib!.......lower........I spent $30 for this crib! It was such a steal. The mattress I bought at Walmart for $40 and the bumper and sheet I bought at Burlington Coat Factory...Bumper-$30 & Sheet-$10.

As many of you know, not only am I an Interior Designer, but I am also a Mural Artist. I don't want to do full on murals in my kids bedrooms, but I want some type of painting in each one. One night I was holding Brooklyn and rocking her when we first moved in and I looked above her crib and it just came to me that I always wanted her to remember that she is a Daughter of God! I decided that I needed to paint it up there so that she can grow up seeing that right there.
These picture frames I LOVE!!! These are ones that I bought unfinished and then painted them myself. I will show you another time how I put this together.

These are window treatments that I made and they are very functional for naps and I love the way they turned out.


This shelf is such a darling shelf. When we moved into this house, my neighbor across the street was moving out of her house. Shortly after we moved in, she had a moving sale going on and we decided to run over. Her house was a model home and had a girl's bedroom all set up... well, she had all boys and didn't have use for the girl's room. She stored all of the girl's stuff and sold it at her moving sale. I got this shelf, brand spanking new, for $5. All of the stuff on both the shelf and the changing table were gifts from people and I haven't quite figured out the best way to display them.

This changing table was another KSL steal! It was purchased separate from the crib but they look like they are a set. I found this for $50 and it is in EXCELLENT condition. I had the changing pad already and I purchased the pad cover for $11 at Burlington Coat Factory. My recliner chair I love and that was a bit more money, but we paid for part of it and then her Grandpa Mark gifted the rest of it to her. It will end up going into Kenidi's nursery when I get that put together and I will find a small chair to put in it's place.

Now these darling little hooks I also got at the moving sale for $1.50 for all 3! I went to go hang them up and my screw heads were to big for the holes on the back so I have to go get new screws.... but they will be hanging on the wall here.

They will eventually hang play clothes I am sure.