Wednesday, September 30, 2009

Nursery Shopping Dilema

Today I went out shopping to find some inspiration fabric for my daughter-on-the-way Kenidi. I want to make her a one of a kind quilt for her crib that she can grow into and use when she is a toddler. I have in my mind what I would like and I can't find it!!!! Here are some samples of what I am looking for that I found online.


I want a Teal, Chocolate Brown, and an Antique White combination and I found absolutely NADA!!! If you by chance are out and notice some fabrics on this line, will you please let me know?!!! I hate when you have something all thought out in your head and you can't seem to find what it is you are looking for. Thanks

Monday, September 28, 2009

Living Room Update

I have been busy working on my living room and I wanted to update you with what I have done so far. I knew in this room that I wanted an accent wall so I needed to start there. I didn't really have anything to go off of for colors so I decided to find the drapes that I liked and go from there. I don't recommend doing this, but I went straight to Target and found the drapes that I wanted (I just bought one for color matching at this point) and drove straight over to Home Depot and picked out my accent color in the store. I got lucky and it worked, but it is definitely better to pick your colors in the room to make sure that the lighting doesn't change the color on you.
Here is the drapery panel and the accent color that I chose to paint. Of course I wasn't just going to stop there! I painted this wall on a Thursday night, let it dry for 2 days, then I glazed (stained) the entire room!
Here is the wall before I glazed......
Here it is after I glazed!
You can see that it isn't a huge difference in color, but the drapes are what tie everything together.
This picture shows how great the wall color looks with the drapes and my Christ picture.
Here is the glaze just over my walls like I have done in the rest of my main level.

So I have to talk about this chair.... I call this my "funny" chair. I found this chair on KSL for $10... yes that is right, $10! I sent my husband to go pick it up and he was a little unsure about it. Anyone who knows me, knows that my style tends to lean more on the clean line side... I consider my style to be Clean Line Traditional, some may consider it Transitional. Anyway, this chair is not what people are used to seeing me pick out. I saw this and thought that I just had to get my hands on it. The fabric is in REALLY great condition considering how old this chair has to be. I think I will keep the fabric on it because it surprisingly goes quite well with the drapes, but the wood color is bothering me. I have decided that I am going to sand the wood down and stain it a dark color. I will put a throw pillow on it and I will have the best, cheapest chair I could have asked for in this spot.

Here is the real color of the fabric, the other pictures had a flash and it made it really shiny looking when it isn't like that in person. Some people may have a hard time having 2 different chairs like I have in this room, that is ok, but it is also ok to mix chairs in a room. I wanted something a little bit different than my usual in this room and I wanted it to be a bit more formal. As you can see, I still have a lot to do in this room, but I am really excited about the direction it is going and I am even more excited about how inexpensive it has been.

Wednesday, September 16, 2009

Window Treatments

Sorry, it has taken me longer to post this than I was expecting. I sometimes toy around with posting things because I am afraid of offending someone. Please know that I NEVER want to offend anyone, so if you have in your house what I say not to do, please don't be upset with me or offended. If you love what is in your home, that really is all that matters.

I have posted a bunch of pictures to show you different window treatments and I will discuss certain things about each one. I can't really say that there are set rules with window treatments, but through the years I have seen what works and looks good and what doesn't. *Sorry if you don't like red, red is my favorite color so I use it alot.

DRAPES AND CURTAINS
These are the most basic and popular kind of window treatment and they happen to be my favorite. I think that a nice, quality panel can do so much for a room. There are so many different type of panels also, you have Tab Top (more casual), Rod Pocket (standard), Grommet (more modern), and my favorite Curtain Rings (more formal). In my home, I pretty much only use the curtain rings. I use them because they do tend to be a bit more formal, I think they hang much prettier, and they add length to the panel.

This first picture is of my bedroom. Like I have mentioned before, I am still in the process of getting my room together, but I just got these hung just a few days ago. I purchased these at JC Penney a few years ago for my last house for approximately $30 a panel. I want you to notice 2 things in this picture: 1-Notice how thick the curtain rod is and 2-Notice that it is touching the floor. Far to often, people hang their drapes to high and don't have them touching the floor. This is something that can draw negative attention that you wouldn't want in a room. Also, a thicker curtian rod tends to give a higher quality look and will make your entire window treatment look way more expensive. I will never use a skinny rod in my home ever again. I used one in my last bedroom and it looked so cheap and ruined the whole treatment I thought.
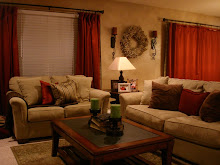
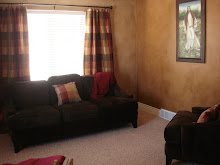
These next 2 pictures are of my family/dining area. Again, I have a thicker rod and they come onto the ground. I actually made these window treatments myself and I will tell you why. I would normally tell a client to find window treatments first and then pick a paint color off of them, but I did it backwards. I painted my burnt red walls in the room first and when it came to finding drapes that matched that color, there was none! I had to find some fabric and have it custom ordered in for me. I did end up spending around $250 for the 4 panels and cornice box but I have been VERY pleased with them and I think they were worth the money. A window treatment really is something that can ruin the whole look of a room. If you can, spend a little more money on draperies, it really is amazing how they can make your room look really expensive or really cheap.
These are completely lined on the inside. We don't like vertical blinds, so we opted for these panels to block the sun out with. Make sure that if they do get direct sunlight, that they are lined curtains so they don't fade.
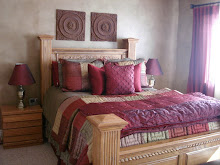
This next picture is of my mom's bedroom. She asked me to create a window treatment for her bedroom and it had to work with her shutters. We went and bought like 20 something yards of fabric and I ruffled this to what it is. There was no sewing at all, actually, you would probably laugh if you saw how I put it together but it created the look we were going for.


Here are the panels we have up to the cabin. These are held up by the Rod Pocket Top and are a very heavy panel. This shows another way that you can display a panel, with a tie back or hook.

VALANCES AND CORNICE BOXES
I have been asked the question "What is a window treatment I can use in the kitchen that won't get gross above the sink." My answer is a valance or cornice box. I am personally not a huge fan of the valances that you buy at the store, so I have created my own for various locations.

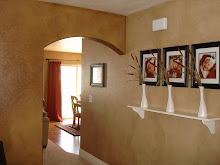
This valance is one that I created to go on the inside of the window. It has such great molding that we didn't want to obstruct it. This is actually just some trim sewn onto some fabric and the fabric is wrapped around a 1"x2" board and screwed into the top. It was so simple to do and it didn't cost a son of money.
This is a cornice box that is made of wood, wrapped in batting and then finished off with the fabric and trim. These are also really quite simple to make. As you will see, I have made a lot of them (even others that I don't have pictures of) and they look great in a kitchen, children's room or over a roman shade.
This one is made the same, I just sewed the fabric how I wanted to wrap it and had my husband cut out the pattern in the wood.
Here is an alternative to a normal valance and it turned out darling. This is a balloon shade with ties. The thing that I love about this, it is fully functional. I can untie the ribbons and it blocks out the sun so that my daughter can sleep better during her naps. This was also really quite simple to make and really quite cost effective.
Here is the cornice box I have made to go on top of the balloon shade, but I haven't been able to get my husband to help me hang it yet.

There are other options out there that you can do in any room, these are just options that I had to show you. This really is one area that is worth spending a bit more money on. I can't emphasize enough how much this can make or break your room. One of the first things I notice when I walk into a room is the window treatments and whether or not they are a cheaper cotton type drape that doesn't hang very well and is completely see through or on a really flimsy rod or if it was done well and it makes the whole room look put together. If I can tell you to spend a bit more money somewhere in the room, it would be here on the window treatments.

If anyone wants to know how things are made, let me know, it is hard to explain on here without pictures.

Tuesday, September 8, 2009

Space Planning

I have 2 rooms that I am really trying to work on right now, my living room and my bedroom. Since I am in the very early stages of getting these 2 rooms going, I decided I would take advantage of it and show a simple way to do space planning. When I am designing a room, I sometimes like to measure and create a floor plan to make sure that I am getting the best furniture arrangement possible and to see what I have room for. I usually draw my own floor plans and design my own furniture and color it. I know everyone doesn't have the tools that I have to do this (not to mention that it is time consuming) so I wanted to find a way that would be simple enough for anyone to do. Here is the link to the Potterybarn website I found. http://www.potterybarn.com/stylehouse/tools/roomdesign/index.cfm This website has furniture for a living room or bedroom that you can download and cut out as well as a grid sheet that you can draw out your floor plan to scale. I took both my living room and bedroom to show how this can be done. Like I said before, I am in the starting phase for both rooms so their isn't much to see in the pictures.

Living Room
This first room is my living room. It has been completely empty until a week ago when my husband and mom surprised me with this sofa and chair as an early birthday present. I found it on KSL for $250 and they went in together and got it. These are the only 2 furniture pieces that I need to work with in my room, so I can add whatever on the floorplans that I feel would fit the space well.

I took 3 different furniture layouts to show how this room could be done with the furniture that I have to use. I will tell you that the Christ picture above the couch in the picture is staying on that wall, that is something that is important to me to have on that wall so I need to work around that. The furniture pieces aren't always used as what they say on it, but I was going for the measurements.


I love how you can easily move the little furniture pieces around and get a feel for what would be the best in the space. Out of these 3 floor plans, I think I will go for the third one right now. I like having the sofa facing the front door and I like having the chairs in the little cove window. Because I only have one chair right now, I will find an accent chair to add to the mix. I am going to paint walls, glaze walls, add window treatments and pillows, and find some tables to work. It will be fun to show you how the whole room comes together one step at a time.

Bedroom
Now my bedroom is a little further along than my living room. I got this bedding a few years ago and I love it so I am designing the whole room around that. For right now, we are keeping the bed but are looking for new nightstands to go with it. I just barely glazed the walls to go with it and I love how it pulled my bedding in and made it feel so warm. I have a fairly large bedroom so I wanted to create a floor plan to see what the best way to add a reading corner would be.


The layout of this room makes it very easy to know where to put the bed automatically, it is the only open wall in the whole room that doesn't have windows or doors on it. I have 2 storage ottomans that James and I built that I would like to keep in the room, so they are in every floor plan.


Now if you look at all 3 floor plans, probably the best one suited for the space is the third one, the one with 2 chairs. I am not canceling that one out, but it is kind of important for me to have a loveseat in the room and here is why: I want this corner to be a reading area for James and I. I would love for this corner to be a scripture corner for us to be able to read together and I think it would be more effective if we had a loveseat and could sit together as opposed to different chairs. I will look on KSL and see what I can find, but I am definitely gearing towards a loveseat even though the chair floor plan seems to work better. We will see as time unfolds what we end up with.

Space Planning Rules:
-Try to leave walk ways of 3 feet. If you have a part of the room that you walk through often, you should always have around 3 feet to walk through that area, anything less and it would feel crowded and you could easily hit corners.
-The space between a coffee table/ottoman and the sofa should be 18". Leave space to walk and to be able to sit down, but you want it close enough to be able to set something on it or put your feet up.
-Try not to put your bed on the same wall as the door you are entering into. Anyone who has heard of Feng Shui, this is a Feng Shui rule that I ALWAYS follow! I know that on occasion that is the only wall to put it on, but definitely try not to. It is very uninviting to walk into a room and have the bed on the side of you and opposed to facing you. Always try to have the bed facing the entry door.
-Another Feng Shui rule that I always follow: Never have your desk facing away from the entry door. When in your office, you should always have the desk facing the entry door and never have your back to the door. If you have ever had this, you may notice the feeling it creates. I have a husband that loves to try and sneak up on me and I had this once and I was constantly looking over my shoulder to see if he was coming behind me. It is not a comfortable layout and should be avoided at every chance possible.
-Along with that, when entering into a room, don't have the back of a sofa facing where you walk in. Again, this is very uninviting and won't make people comfortable to come into the room.
-Now this isn't necessarily a general rule, but this is MY rule! Do not have every piece of furniture facing the t.v.! Create sitting areas that are facing each other. The t.v. does not need to be the only focus of the room. I can't stand it when you go into a room and you are trying to have conversation and you are all facing the same direction practically. I always try to have a chair facing away from the t.v and facing the sofa arrangement, it makes for a much more comfortable conversation area.

Thursday, September 3, 2009

My Family Room

I have finally gotten around to taking pictures of my family room and getting them posted. This is one of the few rooms that I have done. I love the way it turned out and how cozy it feels! As I was kind of going through everything in this room and the cost of it, I was amazed at how much of it was given to me! I haven't spent hardly any money in here in comparison to what it looks like.
My sofas were bought 7 years ago and because it has only been James and I, they still look brand new. Back 7 years ago, we paid about $1000 for the set. The coffee table, end table, and console table were purchased at R.C. Willey Outlet for about $550 or so.
ALL of the accessories but the lamp were given to me or I purchased with a gift card! I have a pillow obsession, I know.... The pillows were either made, purchased for a few dollars at a moving sale, or bought a long time ago.
This picture really shows the colors of my room well. I love my wall colors! The small table in the corner was purchased for a very specific spot in my last house that was tiny, I found it at Target for $16. It was an absolute steal. The table that the t.v. is sitting on, given to us by my step-dad, it was a piece he had before he married my mom.
The clock here was made by my sister and given to me for either my birthday or Christmas.
This is my reading corner and once again, I love it! This chair was actually a trade I did so not a penny was spent out of my pocket for it. The baskets, picture, picture frame, and blanket were all given to me for gifts. I honestly didn't realized how many things were given to me until I sat down here, it really is amazing. Other than the furniture and t.v., the only "splurge" I have in this room are my draperies. I am going to go into that another time, but draperies is a place that you want to spend a little bit more money if you can. Hopefully soon I will get some pictures of my kitchen/dining area that flow from this room to show how it all has come together, I just have a few more things to add to that area.

Wednesday, September 2, 2009

Common Question

I have been getting different questions from people, but they all ultimately ask "What should I do in my room"! This is something that I can't really give you an answer to. There are so many things that I have to take into consideration when designing a room: carpet color, furniture color, pre-existing items, size of the room etc. Without these, I cannot really give you any direction. If you have a generalized question, I can answer that because I don't need specifics, where as with individual rooms I do. When it comes down to a specific room, that is where a one-on-one consultation is necessary.

What NOT to do!!!!

On the glazing video clip I made, I mention to not stop once you have started a room or the section you are doing. Last saturday I decided to glaze my bedroom, I went and bought some more stain because I new I was low, but I didn't think that I needed that much extra so I bought a small container...... Well.... I ran COMPLETELY out! I thought I could make it to the corner and I couldn't. I was scraping the bottom trying and this is what happened!
Here is a picture with no flash. The particles or fillaments were on the bottom and it made it super dark, so when it came to trying to blend it together, there was no way to make it look good. I am so bummed!
Here it is with a flash. It is amazing how bad it is. James and I have decided that from those corners you see in the picture, we are going to repaint and then just reglaze that section. I didn't do it on purpose, but I told everyone not to do it and then it happened to me the next day. If you notice you are getting low, stop in a corner and wait until you can get more stain. Blending in a corner isn't as nearly noticable as in the middle of a wall!
Related Posts with Thumbnails