Saturday, October 31, 2009

Cheap and Simple - Side Table and Basket

I have posted a Cheap and Simple post before and I decided that I was going to do a "series" of these posts, which will be projects for under $10 (usually less) and don't take much artistic skill at all.

A few weeks ago, I was in the DI thriftstore and came across this table.
It was marked at $10 and I was kind of considering it. The bottom tray shelf was broken and needed fixing but I knew I could do that. One of the workers saw me looking at it and approached me and said "If you are willing to buy this, I will mark it down to $5. I need to get the floor cleared for Saturday." He ran out and grabbed his price gun before I even had a chance to answer. What the heck I thought, can't beat a $5 table.

My husband of course thought I was crazy with seeing the broken shelf and told me "you know most of this stuff will just be coming right back here." I looked at him and said "have a little faith in me would ya"

I have pretty much turned our unfinished basement into a spray paint gallery. I took the table down there and fixed the shelf with some Gorilla Glue and then took this left over black paint that I had from a furniture refinish I did years ago.
I got started painting it and realized that I didn't have the patience to sit and paint this whole thing with a few coats of paint and do a good job.
I did a quick cover with the paint and decided to pull the spray paint out!
And here is the final reveal of it. I am going to use this in between my 2 chairs in the office and I am really happy with the way that it turned out.

My husband was even impressed with the way that it turned out and I think that even he would agree that it isn't going back to the DI anytime soon.
I will show it all put together and with the chairs next to it when I show the full office reveal.
I absolutely love these cheap and simple projects and I know that my husband loves that they cost him almost nothing!

Now here is another project I did. On the same DI run as the table, I found this basket. I have been wanting a basket by my front door so that people know to take off their shoes and put them in there. I found this basket for $3 and thought that it would be perfect.
I took some brown spray paint that I had and coated it up (baskets always take a couple of coats from different angles to get inside the weaves) and then after that dried I did a very light coat with some black spray paint at a distance to tone down the brown.
After I got it all sprayed, I realized that if I used the basket for shoes, it would probably take all of the paint off, so I decided to use it for my blankets instead.

I was actually able to do BOTH of these projects for under $10 and I had the spray paint lying around in my basement already. SO cheap and simple!

Thursday, October 29, 2009

Office Dilemma

Remember in my Inspiration Post I mentioned how this fabric was my inspiration for the office? Well, I am having a serious dilemma and I'm not quite sure what to do!
My step-dad gave me his chairs from his old work office. There are 4 chairs, I am only using two in my office..... Here is the BIG DILEMMA for me..... They are BLUE!

Do you see any blue in this fabric? And if you read my Paint Post a while ago, you know my feelings on the color blue in my own personal house.

Here is the thing, I can use this fabric and make green slipcovers for the chairs, but to be completely honest, there are a lot of other projects that I would rather spend my time and money on. I also have a lot of pictures and objects from our travels that have blue in them.
I have fought and fought putting blue in this room and I feel like I am losing the fight.

I have been putting together my photo gallery for the office ( I can't wait to show you how great the picture displays are looking) and I was going through my travel pictures and came across these pictures of my daughter in her Hawaiian dress.
I got looking at the colors and thought maybe this dress would work for my inspiration! It has navy blue in it along with orange and green. My walls are an orangey, caramel color and I have a lot of green items that I was going to put in the room as well as paint an accent wall on my stairs green. I would need to see if I can find some fabric that gives the travel feel for my drapes and pillows for the chairs. I need to go do some hunting, but just maybe I can come to terms with blue in my home and make this office look fabulous still!

Stay Tuned to see the final reveal..... Hopefully it will be coming soon!


Monday, October 26, 2009

Tip Of The Week - Bay Windows

I know that this is something that people will appreciate knowing. This is something that even my husband questioned me on and I will stick strong to this tip.

How many of you have a bay window or a jetted out window like I have here in this picture?
I know that when people are painting their walls and they come to this window, they ask themselves "Do I paint the ceiling in here or do I leave it white?" People usually will leave it white because it is a ceiling, right?!

Well don't!..:)....Please, Please, Please paint the ceiling area of your window the SAME color as the walls!!!

I really want to emphasize this. I really wish I had a DO NOT example but I don't.
If you look at my window, you notice the window! That is the goal, right!
If you leave the ceiling area white, that is what you are going to notice right away and that isn't where your attention should be going.

I hope this tip makes sense to everyone and that they can understand and appreciate it. I hate seeing people have a little bit darker color on their walls and this white ceiling area in their window and all you notice is the ceiling area because it stands out.

Please trust me on this one!

Thursday, October 22, 2009

Inspiration Piece

When I posted about Brooklyn's nursery, I mentioned my Inspiration Piece.
This quilt was my inspiration piece for that room. I pretty much design every room that I do in this very same way. I won't start designing a room in my home until I have found that piece that inspires that spark of ideas to flow to me.
If you have ever seen Color Splash with David Bromstad on HGTV before, he designs in this very same way and I love that he does it. It is amazing what ideas can come to you when you have that one piece that you love for that room.

Here are some more of my inspiration pieces that have helped spark those ideas for my own home.

Kenidi's Nursery:
I have been working on my baby-on-the-way's nursery and I wanted something different (of course). I was given this brown bedskirt that my mother-in-law made for my twin nephew and niece that they were no longer using. I found this beadboard picture frame at the DI for $2.00 and I loved it just the way it was, and then this is my favorite shirt that I can wear being pregnant (the color is so pretty and I have always wanted to have it in a room).
If I can find a fabric with all the colors in it, I can get started on this room. I have this room designed in my head and it is going to be GORGEOUS but I need to find that darn Inspiration Fabric so I can get her bedding going.

Family Room/Kitchen:
The inspiration for this area was simply the wall color. I found this color and just had to have it. I had all neutral furniture so I could start from scratch and this was the color that I wanted in my home.
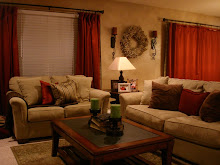
Living Room:
The checkered drapes were my inspiration for getting this room going. I had found the sofa and chair and since they were chocolate, I could put anything with it. I wanted something that was different than my family room but that would flow. There are similar colors in each room but they are very different feels. I fell in love with the checkered fabric and I was able to pull the accent wall color from it (the wall behind it) and I was able to go through my fabric bins and I pulled out the peachy and gold fabrics and thought they would look great incorporated in pillows, and then I found the red fabric at the DI for $3.00 and I am going to create a bench/coffee table upholstered in the red. I am way excited for this room to come together but because it is my front room and I want it a little bit more formal, it is taking me longer to get it together and paid for.
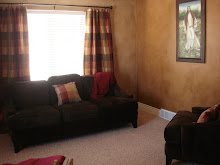
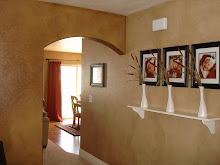
Office:
We like to travel a lot with my family and we wanted our office to represent that and showcase all of our pictures. I wanted it to flow with the rest of my house but still have the fun side of traveling and I found this fabric. I actually found this fabric back years ago and I never did anything with it. I pulled it out a few weeks ago and it inspired the whole pull together of my office.

I have a big gorgeous black desk in my office that is VERY Potterybarnesc and I wanted to tie that in with black picture frames. I got this palm tree statue from Mexico and I took this lamp from a Hourder's house (someone who has an addiction to shopping and just buys for the sake of buying and just lets everything stack up in their home). When I pulled this fabric out, all of those ideas started popping out and I am in the process of putting this room together. You can see in the background that I have got the walls painted and stained, I have just been waiting for them to not be tacky anymore so that I can move forward. Can't wait to show you the final product.
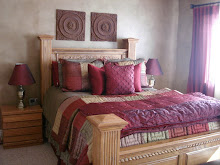
Master Bedroom:
There were a few things that actually contributed to my master bedroom. First off, this greenish/bronze colored bedding. This was old bedding of my sister's that she let us take and use while we were finding some bedding that we wanted. Well, it turned out that my husband really liked it and didn't want to get rid of it. I on the other hand, needed more color. I had this red blanket that I had gotten a year or so earlier and wanted to use that. I decided that I needed to compromise with my husband, so I kept the bedding that he liked, but then I added the checkered bedding that I have on there. It is a very layered affect, but it is something that makes both him and me happy. (I know there is a lot of red on my bed, but that will be dispersed throughout the room once I get a sitting area put in.)
This is also something that was important for me to use in the room. These are candlestick holder's that were my grandmother's. I haven't found a spot for them yet, but you can bet that I will try and find a creative way to use them in the room or in the master bathroom.

Spare Bedroom:
I haven't really done anything yet with this room, but I have had these pillows for years. They have been sitting in a box and I decided that I wanted to use them as my inspiration pieces for the spare. I have a lot of orange items that I don't have anywhere to put in this house, so I thought they would work well in the spare bedroom. I am still waiting for that flood of ideas to come from the pillows though! :)


Guest/Kid's bathroom:
My favorite season of the year is the Fall time. James and I had these pictures taken a few years ago and I loved the colors so much that I wanted to incorporate those colors in a room. Well, it went to the bathroom.
I found this shower curtain that had all of the colors in it. I have a few other accessories up in there but the room is so tiny that I can't really do a whole lot with it. Plus, because it is my kid's bathroom, I also have to be practical.
Laundry Room:
I bought this rug a couple of years ago for my front door. It is really flimsy so we didn't want to use it there in this house. I decided to put it in my laundry room and I think it will work great in there. My laundry room is actually our only bathroom also on the main level so it gets seen more than laundry rooms should. Since you can't see the rug colors real great, they are rust orange/red, olive green and golden yellow. I have actually bought the paint already and we are going to paint this room green. I can't wait to actually get going on it and make this room look presentable for people to use it.

Well, there are my inspirations for my house. Do you have something that you love that has helped sparked those ideas. I have found that this is the best way to start off designing a room. Go out and find those Inspiration Pieces that you can use in your home.

Open House for Home Decor

BACK HOME DECOR

Back home decor is the company that I spoke about in a post of mine a few days ago. These two, Katie and Karen, offer home decor at a fraction of the cost of retailers. They have some great every day home decor, but they have some darling holiday items right now. If you have Christmas on the brain like I do, they have some awesome things that can be used in your Christmas trees (beady thingys which I LOVE in Christmas Trees), as well as cute Halloween and Fall decor.

If you are interested in going, send me an email or leave a comment and I will give you the exact address.... I didn't want to leave their home address up on the blog. Here is the invitation.

Check them out! You can do some early Christmas shopping!
Type:
Date:
Saturday, October 24, 2009
Time:
1:00pm - 4:00pm
Location:
Lehi UT 84043
Amazing Home Decor at discount Prices! Come get all your Holiday needs.
Open House
Katie & Karen are starting a business where we are selling Home decor Items at almost half the cost of what are in stores.. We have been selling online and in California and wanted to share our savings with our friends and family.. We have cute Holiday and Everyday home decor. Come and visit we'd love to see you all!!
Great prices on Home Decor, also decorating Ideas and info.
Kids are Welcome so come at any time!!
C-ya There

Wednesday, October 21, 2009

Cheap and Simple - Waste Basket

I was at the dollar store and ran into this everyday basket.
I looked at that and thought Waste Basket! I don't know about you guys, but I have had an 8 year old yucky, ugly waste basket in my laundry room/bathroom and I was sick of it. Sure it was functional, but I wanted something that was attractive, and have you ever gone and looked to purchase a nice waste basket at the store? They can be extremely pricey and who wants to pay that for their trash?!

So... I took my handy dandy black spray paint and sprayed the thing down, bought some little garbage bags to put inside and wala!...
A new, more attractive waste basket

And the best part.... I only cost me $1 people!!!! I am thinking that I am going to go purchase another one for my master bathroom now. How can you pass up such a cheap and simple thing as that?!

Tuesday, October 20, 2009

Purchasing an Online Consultation

If you are wanting to purchase an online consultation this is what it en tales.

Each consultation is on a per room basis and is $25 per consultation. If you select Online Consultation and Add to Cart, it will take you through a Paypal purchase. Once I have received your purchase, I will email you a questionnaire with the information that I need from you and the list of digital pictures that I will also need from you. If there is any other additional information that I will need from you, you can let me know that with the questionnaire.

I will basically help you with whatever you need help on in that particular room. If you need help picking or changing a paint color, accessory ideas, drapes, pictures, adding details, etc. The list really does go on and on. Let me know what your questions are with that room.

I will take the digital pictures, and based off of what you have given me, I will put together any sketches and pictures and present them to you in an email. If there is something that you are unsure of or aren't quite happy with, let me know and we will change it to what suits you best.

I will not be doing any detailed drawings for any consultation, if you are wanting detailed drawings of a floorplan or elevation, that is a separate purchase.

Please let me know if there is anything that you do not understand with the purchase of a consultation. Thank you for your patience and your input, I have done in home consultations for years, but I am still trying to get the details together for online consultations.

Lindsi Gabler

Monday, October 19, 2009

Making Of - Fall Table Centerpiece

I am not one to really decorate for the Fall or Halloween, I would much rather spend my money on something that is more permanent in my home year round. But I really do love it when people do the seasonal decorating.

I did decide that I wanted to do a centerpiece on my kitchen table that can be used for the Fall and then switch a few things and it can be used for Christmas also ( I do LOVE Christmas decorating).
I had seen this idea back years ago and had wanted to do it, but I am not much of a glass vase type person so I couldn't picture it in my house..... Well, I was on another girl's design blog a little ago and she had this idea on there that she did for her dining table and covered the vases with fabric. BRILLIANT! Why didn't I think of that?

This whole thing cost me less than $25 and I love that I can just switch things out and have new centerpiece for Christmas and I already have the stuff for the Christmas one.

How to Make it-
Start off with any mirror. I bought this one at the DI thrift store for $2.00.
I didn't like the gold frame on it so I spray painted it black with the leftover spray paint from my Family frame project. (Make sure that you tape it off completely before you spray paint so you don't ruin the actual mirror)
After it dried, I took some metallic copper paint I had (I bought at Walmart for $1 something) and rubbed my finger over the raised ornamentation to highlight it. (In this picture, the corner and the side had been done but the top had not)
Then I took 3 vases. I had the large one for the center just sitting around, but I had to buy the two side ones and I got them at Walmart for $2.00 a piece. I also bought the fabric at Walmart for $1.50 a yard. ( I bought 2 yards and I don't even think I used half a yard for these 3 vases but I wanted extra just in case.) Line the edges up and cut it to size


Get some double stick tape and tape it down, roll the fabric around, fold the edge in and tape down and then tape the folded edge over the first edge that was taped down.
I bought some little pumpkins and gourds at Walmart for $.78 a piece (bought 5), 3 beaded candle rings which were $2.99 a piece from Back Home Decor (I am going to do a whole post on Back Home Decor in an upcoming post. These 2 have awesome home accessories for inexpensive that they sell out of their home, that means they can save you money compared to the retailers!), and some fall leaves from the dollar store ( I bought 1 bunch and then just cut it apart with a wire cutter and placed it all around).
I put glass votive holders in each one and purchased 3 votives from the dollar store and lit it all up. Of course the picture doesn't do it justice, it really is a cool little piece and you can see the reflection in the mirror underneath.

So this is my one little thing that is fall that I have in my house. If you would like some other ideas for Halloween or Fall decorating, check out this girl's blog
She has actually made me want to start decorating for Halloween and Fall and I have never really cared about that before.

Friday, October 16, 2009

Online Consultation Giveaway Winner!

I would really like to Thank everyone for helping me spread the word about this blog! Even if you don't need a personal consultation with me, I love being able to share the projects and ideas I have with people, and knowing that people are coming here and reading the posts makes me want to do more.

The WINNER of the first Online Consultation Giveaway is....

ANNA STODDARD!!!

Thanks Anna for spreading the word to your friends and family and helping this blog become more known by people.

Please email me so that I have your email address and can get you the information that you will need to move forward with your consultation.

Thursday, October 15, 2009

Making Of - Brooklyn's Ribbon Picture Frames

In Brooklyn's nursery I have 3 picture frames hanging above her crib and here is how I made those.
First I bought these picture frames unfinished at Roberts Crafts. I actually went in there 3 separate times with a 50% off coupon so I could get the discount on each frame. With the discount, they cost me about $4.00 a piece.

The ribbon I purchased at Joann's Fabrics for $3.99 a roll and I needed 2 (with quite a bit left over).
The first step is to paint the base coat which was a red brown color with cheap acrylic paint. Let that dry, then paint over it with top color which was a pink color that I created with a pink, grey, and white acrylic paint.

After that has dried, take a very fine sand paper and lightly rub on the edges and in various spots on the front to wear the pink off and show the bottom layer of the brown through.
When those have dried, take the ribbon and measure in your desired spot on the back of the frame, angle each side inward and staple in place.

To do the 2nd and 3rd frames, I laid them over the first frame so that I could get the angle exactly the same on each one.
I tied the bows, making sure they were the same length, and hung them up on nails. Once again, this was such a cheap way to make a big impact and focal point in this nursery and I love how it turned out!

LAST DAY for GIVEAWAY

Today is the last day for the GIVEAWAY, so tell your friends and family and have them leave your name in the comments section!

HURRY, HURRY..... Don't Delay

Making Of - FAMILY Sign

Remember the small wall from my glazing video? Remember how I said that eventually something would be hanging on that wall? Well I finally put something together and I am so excited to show it to you because of how incredibly INEXPENSIVE it was!!!!

Well Here is what I made!
How to Make:


The first thing I did was go to our local thrift store, Deseret Industries (the DI) and purchase this picture frame for $2.00!
You can see from this picture that it was a bit beat up.... Nothing some spray paint couldn't cover!
I sprayed the frame with this black spray paint.... This kind I got at Walmart for $.97! And I was able to use it for other projects also.
first I printed out the letters on the computer and cut them out...
then I went over them with a black marker on the front and sides..... Spent all of this time getting it all cut out and finished.... Then my husband told me that you can still print on big paper if you create a custom size!

So, after spending all of this time on it, he PRINTED it out for me straight on my paper and saved me the hassle of having to spray glue it down! Wish I would have known that before I spent all the time cutting those things out!
Because my picture frame opening was 16"x6", I needed to go buy some special paper that was big enough. This is art paper and it cost me approximately $2.50. I took the glass out and with my exact o-knife, cut around it.
I took some chalks and a little cotton ball and colored around the edges to add something to the paper.
I used a light brown, dark brown, red brown, and a red layered on top of each other to create the edges to look like this.
And here it is finished on my wall. This project cost me approximately $5.00 and it is a good size, not a small dinky picture. I am so glad to have something on that wall now and that the empty void isn't staring at me every time I walk into the kitchen.

The nice thing is, you have left over paper and spray paint to use for another project!

Monday, October 12, 2009

Making Of - Brooklyn's Balloon Shade

I have been asked how I made Brooklyn's balloon shade in her nursery, so I hope I can explain it well enough for everyone to understand. This is such a simple window treatment to make and I think it is such a cute alternative to the standard nursery valance that usually comes with the crib bedding sets.

I did not have my blog started when I made this so I don't have step-by-step pictures.

*The first thing that you need to do is measure your window. My window was pretty much a perfect square window I believe at 47". Since my fabric was only 45" wide, I had to purchase more fabric and lay it lengthwise to fit. I cut 2 separate pieces, one that is on the top above the ribbons, and the main full piece. I wanted it to hang about 2" over on the sides and the bottom to make sure that is blocked out sunlight, so I measured an extra 2" on each side plus an additional 1 1/2" - 2" for the hem on the back. The top piece needs to be an additional 4" for the rod pocket on the very top. The fabric I used was a flannel type fabric, I wanted something that didn't wrinkle terribly when tied it up.

*I wanted my shade lined for black out purposes for naps so I measured the liner 1/2"-1" shorter on each side so that the hem wasn't to bulky when folded back and sewn.
*I bought 2 spools of 12' ribbon and just used one roll for each side.

SEWING
*Take the large bottom piece and lay the liner on the back side of the fabric.
*Take the ribbon off of the spool and fold in half, mark with a pin. Do this to both spools of ribbon.
*On your main fabric, measure in about 12"-14" from the sides and pin the ribbon on the top of fabric at the center point where you pinned earlier.
*Place the smaller fabric (that is the top section) on top of the main fabric and ribbon. (Half of your ribbon should be hanging out the back side.
*Sew straight across.
* Hem the 2 sides and the bottom, folding over about a half an inch and then folding over again so give it a cleaner look. Sew
*After the sides and bottom are sewn, fold the top down a half an inch and then approximately 3"-4" and sew straight across, this will create the pocket for the rod to go through.
*I bought a cheap $5 rod at Walmart, this is just a real skinny one. I knew it would be covered by the cornice box.
This is such a simple project, it probably sounds more difficult than it really is. I hope I explained it alright. In the future when I make treatments, I will either take pictures of the steps, or I will make a video of what I do.
Related Posts with Thumbnails